Implementing code examples for running on GPU
Overview
Teaching: 30 min
Exercises: 20 minQuestions
How do CPU and GPU programs differ?
What tools and programming models are used for HPC development?
Objectives
Understand the structure of CPU and GPU code examples.
Identify differences between serial, multi-threaded, and GPU-accelerated code.
Recognize common programming models like OpenMP, MPI, and CUDA.
Appreciate performance trade-offs and profiling basics.
GPU Programming
In the previous section, we saw how we can get a significant speedup by parallelizing tasks across a few CPU cores. This is like turning a solo job into a small team effort. But what happens when the calculations within each task are incredibly demanding? For problems involving massive datasets, like complex simulations or training deep learning models, even a dozen CPU cores can struggle to finish in a reasonable time. This is where we need to move from a small team to a massive army of workers: GPUs.
GPU Programming Concepts
GPUs, or Graphics Processing Units, are composed of thousands of lightweight processing cores that are optimized for handling multiple operations simultaneously. This parallel architecture makes them particularly effective for data-parallel problems, where the same operation is performed independently across large datasets such as matrix multiplications, vector operations, or image processing tasks.
Originally designed to accelerate the rendering of complex graphics and visual effects in computer games, GPUs are inherently well-suited for high-throughput computations involving large tensors and multidimensional arrays. Their architecture enables them to perform numerous arithmetic operations in parallel, which has made them increasingly valuable in scientific computing, deep learning, and simulations.
Even without explicit parallel programming, many modern libraries and frameworks (such as TensorFlow, PyTorch, and CuPy) can automatically leverage GPU acceleration to significantly improve performance. However, to fully exploit the computational power of GPUs, especially in high-performance computing (HPC) environments, explicit parallelization is often employed.
CPU vs GPU Architecture
The fundamental difference lies in their design philosophy. CPUs are optimized for low latency on sequential tasks, while GPUs are built for high throughput on parallel tasks.
- CPUs: Few powerful cores, better for sequential tasks.
- GPUs: Many lightweight cores, ideal for parallel workloads.

Unlike CPU, that has to handle huge variety of tasks and control data flow in a complicated manner, GPUs dedicate more transistors to data operations. Credit: CUDA C Programming Guide
Comparing CPU and GPU Approaches
| Feature | CPU (OpenMP/MPI) | GPU (CUDA) |
|---|---|---|
| Cores | Few (2–64) | Thousands (1024–10000+) |
| Memory | Shared / distributed | Device-local (needs transfer) |
| Programming | Easier to debug | Requires more setup |
| Performance | Good for logic-heavy tasks | Excellent for large, data-parallel problems |
Introduction to CUDA
In HPC systems, CUDA (Compute Unified Device Architecture), a parallel computing platform and programming model developed by NVIDIA is the most widely used platform for GPU programming. CUDA allows developers to write highly parallel code that runs directly on the GPU, providing fine-grained control over memory usage, thread management, and performance optimization. It allows developers to harness the power of NVIDIA GPUs for general-purpose computing, known as GPGPU (General-Purpose computing on Graphics Processing Units).
In 2006, NVIDIA introduced CUDA, the first platform to provide direct access to the GPU’s virtual instruction set and parallel computational elements. Before CUDA, GPUs were primarily used for rendering graphics, and general-purpose computations required indirect use through graphics APIs like OpenGL or DirectX. CUDA revolutionized scientific computing, deep learning, and high-performance computing (HPC) by enabling massive parallelism and accelerating workloads previously limited to CPUs.
Currently, libraries for writing code in CUDA exist in C, C++, Fortran, and Python. A typical CUDA program runs both on CPU (‘host’) and GPU (‘device’), with CPU responsible for data preparation, memory allocation, and data transfer, and GPU running CUDA kernels, which are essentially functions.
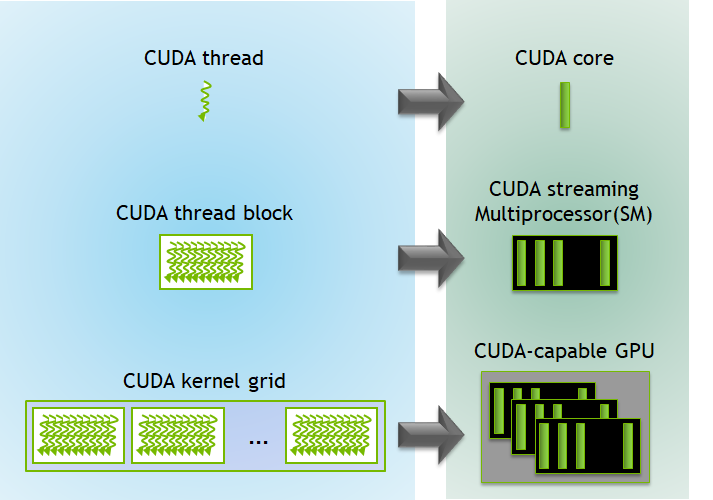
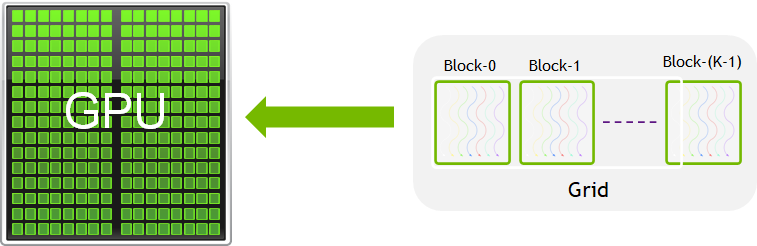
CUDA Hierarchy
There are two aspects to programming for GPU - one is related to the logic of CUDA program, and another is about physical organization of a GPU.
On the logical level, the basic element of CUDA code is a thread. Threads execute the same piece of code (the same kernel), but on different pieces of the data. At every moment, the thread executes only one command. Threads are grouped into blocks, with each block having thousands of threads that have access to the same internal fast shared memory, to which all threads in this block have access, while threads from different blocks have to communicate via global memory. A block can group up to thousands of threads, with a limit determined by the hardware (often it’s 1024 threads). Blocks are then grouped into a grid, which is the highest level of this hierarchy. You can choose the dimensionality of the grid depending on your task - it can be 1D, 2D, or 3D. For example, for image processing, it is often convenient to use 2D grids.
At the level of hardware, each thread corresponds to a core, which is similar to CPU cores, although GPU cores have a simpler design. This is the reason why GPUs can have thousands of cores, while CPUs have only a few dozen. CPU is optimized for the maximum performance of a single-core, sequential code execution, while GPUs are optimized for simultaneous execution of the same simple command on multiple cores. A physical counterpart to the blocks are Streaming Multiprocessors (SM). Each SM contains:
- Many CUDA cores (e.g., 64–128, depending on GPU generation).
- Registers → very fast storage for threads.
- Shared memory → a small, fast memory space for threads in the same block.
-
Schedulers → decide which threads run next. Modern GPUs have tens of SMs, each with dozens of CUDA cores, enabling massive parallelism across the grid.
- Each thread in the grid has a unique ID (
threadIdx) so it knows which piece of data to work on. Depending on the grid dimensionality, the equation for computingthreadIdxwill be different. For example, for a 1D grid, considering that each thread has coordinatesthreadIdx.x,threadIdx.y,threadIdx.z: globalThreadID = blockIdx.x * blockDim.x + threadIdx.x
This formula lets every thread know its global position in the grid.
4. Summary Table
| Level | Unit | Purpose | ID Reference | Hardware Mapping |
|---|---|---|---|---|
| Thread | 1 thread | Smallest unit of computation | threadIdx |
CUDA Core |
| Thread Block | Group of threads | Shares memory, synchronizes threads | blockIdx, threadIdx |
Streaming Multiprocessor (SM) |
| Grid (Kernel) | Block of blocks | Scales to the entire dataset | gridDim, blockDim, threadIdx |
Full GPU |
We can visualise this using the diagrams given below:
As we already mentioned, a CUDA program includes:
- Host code: Runs on the CPU, manages memory, and launches kernels.
- Device code (kernel): Runs on the GPU.
- Memory management: Host/device memory allocations and transfers.
Therefore, to execute any CUDA program, there are three main steps:
- Copy the input data from host memory to device memory, also known as host-to-device transfer.
- Load the GPU program and execute, caching data on-chip for performance.
- Copy the results from device memory to host memory, also called device-to-host transfer.
CUDA Libraries in Python
When programming GPUs from Python, we can choose between different levels of abstraction. Some libraries hide most of the CUDA details, while others give us fine-grained control. This choice depends on whether you want quick prototyping, large-scale training, or custom GPU kernels.
The high-level libraries handle most CUDA operations automatically. They are easiest to use when your goal is training models or working with arrays without writing GPU kernels.
- PyTorch: Deep learning framework with dynamic computation graphs; move data to GPU with
.to("cuda"). - TensorFlow: Deep learning framework with built-in GPU acceleration; runs on GPU automatically if available.
- JAX: NumPy-like library from Google; uses XLA to JIT-compile code for CPU, GPU (CUDA), and TPU backends.
Mid-Level CUDA Libraries provide a familiar NumPy-like interface but allow more explicit GPU control when needed. An example of such a library is CuPy: Drop-in replacement for NumPy arrays; runs operations on the GPU and also supports writing custom CUDA kernels. Low-level libraries give you the most control. You can write your own GPU kernels and manage device memory directly. In a few minutes we try Numba, which is a JIT compiler for Python; it allows writing custom CUDA kernels using @cuda.jit.
Implementing the libraries to use CUDA
We will now implement vector addition for an input array of one million elements using two approaches: a high-level library (PyTorch) and a low-level library (Numba). These libraries were already installed during the Bura Setup stage of the environment configuration.
Let’s check CUDA availability before running code:
# File Name - cuda_check.py
# This script checks whether CUDA is available using Numba
# and prints the name of the detected GPU if present.

# Import Numba's CUDA module
from numba import cuda

# Check if CUDA-capable GPU is available
if cuda.is_available():
    print("CUDA is available!")

    # Get information about the current GPU device
    print(f"Detected GPU: {cuda.get_current_device().name}")
else:
    print("CUDA is NOT available.")
CUDA is available!
Detected GPU: b'NVIDIA GeForce RTX 3060 Laptop GPU'
Approach 1: Add vectors using the numba Python library
# File Name - numba_cuda.py
# This script demonstrates vector addition on the GPU using Numba's CUDA JIT.
# 1. Define a CUDA kernel for element-wise vector addition.
# 2. Allocate and copy input arrays to the GPU.
# 3. Configure the kernel launch (blocks and threads).
# 4. Run the kernel on the GPU and measure execution time.
# 5. Copy results back to the host and verify correctness.

# Import Numba's CUDA module, NumPy for array operations and time to measure execution time
from numba import cuda
import numpy as np
import time

# @cuda.jit is a decorator provided by Numba.
# It tells Numba to compile the following function (add_vectors) into a CUDA kernel
# that can be executed on the GPU.
# This allows Python code to be transformed into low-level GPU code.
# Therefore @cuda.jit is used to define a CUDA kernel for vector addition
@cuda.jit
def add_vectors(a, b, c):
    # Compute absolute thread index within the entire grid
    i = cuda.grid(1)

    # Perform addition only if within bounds
    if i < a.size:
        c[i] = a[i] + b[i]

# Setup input arrays
N = 1000
a = np.arange(N, dtype=np.float32)
b = np.arange(N, dtype=np.float32)
c = np.zeros_like(a)

# Copy arrays to device
d_a = cuda.to_device(a)
d_b = cuda.to_device(b)
d_c = cuda.device_array_like(a)

# Configure the kernel
threads_per_block = 256
# Typically, GPUs allow up to 1024 threads per block in 1D (depends on GPU architecture).
# Using multiples of 32 is often optimal because of "warps" (groups of 32 threads scheduled together).

blocks_per_grid = (N + threads_per_block - 1) // threads_per_block
# Ensure all elements are covered by rounding up.
# Grid size (total number of threads) = blocks_per_grid * threads_per_block.
# Hardware limitation: Max grid size depends on GPU (often in the range of 2^31-1 for 1D).

# Launch the kernel
start = time.time()
add_vectors[blocks_per_grid, threads_per_block](d_a, d_b, d_c)
cuda.synchronize()  # Wait for GPU to finish
gpu_time = time.time() - start

# Copy result back to host
d_c.copy_to_host(c)

# Verify results
print("First 5 results:", c[:5])
print("Time taken on GPU:", gpu_time, "seconds")
/home/alex/miniconda3/envs/interpython_hpc/lib/python3.13/site-packages/numba/cuda/dispatcher.py:536: NumbaPerformanceWarning: Grid size 4 will likely result in GPU under-utilization due to low occupancy.
  warn(NumbaPerformanceWarning(msg))
First 5 results: [0. 2. 4. 6. 8.]
Time taken on GPU: 0.10699796676635742 seconds
In the Numba example, we see how CUDA works at a low level:
- We first define a GPU kernel using
@cuda.jit. This kernel runs on the GPU and performs vector addition element by element. - The code
@cuda.jitis a decorator. A decorator in Python is essentially a function that modifies or extends the behavior of another function or class without changing its source code. - Basically it passes function
add_vectorsinto the cuda.jit function which turns the python code into low level GPU code. - The function
cuda.grid(1)gives each thread a unique indexi. Each GPU thread computes one element of the result. - We must explicitly copy data from host (CPU) memory to device (GPU) memory with
cuda.to_device. - We also configure how many threads per block and how many blocks per grid to use before launching the kernel.
- Finally, we copy the results back from device to host memory.
This approach is very close to how CUDA is programmed in C/C++. Taking care of threads, blocks, and memory transfers is mandatory when we are doing programming with a low-level tool, such as CUDA.
Python decorators
It is entirely possible that even if you’ve been programming with Python for a long time now, you have never encountered decorators before. They may seem mysterious, however, the idea behind them is quite simple - they are wrapper functions, that accept user-defined function as a parameter. This is possible because in Python, everything is an object, including functions, so you can assign them to a variable, pass as a parameter or return from another function. Common application for decorators is logging or performance measurement, or, as we saw above, a conversion to a format that can be executed on a GPU.
Approach 2: Add vectors using Torch
# File Name - torch_cuda.py
# This script demonstrates performing vector addition on a GPU using PyTorch.
# It highlights how PyTorch can leverage CUDA-enabled GPUs to accelerate
# array operations compared to CPU execution.

# Import PyTorch for GPU-accelerated tensor operations and time for measuring execution time
import torch
import time

# Define the size of the vectors
N = 1_000_000

# Create two input tensors 'a' and 'b' directly on the GPU
# (dtype=float32 for efficiency, device="cuda" ensures they are allocated on GPU)
a = torch.arange(N, dtype=torch.float32, device="cuda")
b = torch.arange(N, dtype=torch.float32, device="cuda")

# Record the start time before performing the vector addition
start = time.time()

# Perform element-wise vector addition on the GPU
c = a + b

# Synchronize with the GPU to ensure that all operations have finished
# (without this, the recorded time may not include the actual GPU computation)
torch.cuda.synchronize()

# Calculate the total elapsed GPU execution time
gpu_time = time.time() - start

# Print the first 5 results of the output vector after moving them back to CPU
# (useful to verify correctness of computation)
print("First 5 results:", c[:5].cpu().numpy())

# Print the total time taken for the GPU computation
print("Time taken on GPU (PyTorch):", gpu_time, "seconds")
First 5 results: [0. 2. 4. 6. 8.]
Time taken on GPU (PyTorch): 0.03913474082946777 seconds
Here, the same operation looks much simpler:
- We create tensors directly on the GPU by specifying
device="cuda". - Adding them with
c = a + bautomatically runs the computation on the GPU. - We call
torch.cuda.synchronize()to make sure the GPU finishes before timing. - If we want to print results, we copy them back to the CPU with
.cpu().numpy().
Here, PyTorch hides all CUDA details. We don’t need to worry about threads, blocks, or explicit memory transfers — the library manages them for us.
Slurm Script to execute the code
The following script can be used to submit a GPU-accelerated Python job (numba_cuda_test.py) using Slurm:
#!/bin/bash
#SBATCH --job-name=cuda_libraries # Name of the Job
#SBATCH --output=cuda_l_%j.out # Name of the output file for the Job
#SBATCH --error=cuda_l_%j.err # Name of the error file for the Job
#SBATCH --partition=gpu # Request the appropriate partition for the job
#SBATCH --nodes=1 # Request the appropriate number of computing nodes required for the job
#SBATCH --cpus-per-task=4 # Request the appropriate number of cpus per computing node required for the job
#SBATCH --mem=16G # This specifies the amount of memory which will be allocated for the job
#SBATCH --gpus-per-node=1 # Request the appropriate number of gpus per computing node required for the job
#SBATCH --time=00:10:00 # This specifies the maximum amount of time that the job will run for

# Load required modules (This is a sanity check in case jobs are not running as required)
module list

# Activate your virtual environment (We have already activated this in terminal so this again a sanity check)
source interpython/bin/activate

# Run the Python example scripts sequentially
python numba_cuda.py
python torch_cuda.py
Exercise: Vector Multiplication on the GPU
In the previous examples, we added two vectors together using Numba and PyTorch.
Now, modify both codes so that they multiply two vectors element by element instead of adding them.
- For Numba: change the CUDA kernel so that each thread multiplies elements instead of adding them.
- For PyTorch: replace the addition operation with multiplication.
Try running your code and compare the results.
Solution
Numba solution:
# File Name - numba_multiplication.py
# This script demonstrates element-wise multiplication of two vectors using Numba with CUDA.
# It highlights how GPU kernels can be written in Python using Numba’s @cuda.jit decorator,
# and how memory needs to be managed explicitly between host (CPU) and device (GPU).

# Import Numba’s CUDA module to write GPU kernels and NumPy for array creation and manipulation
from numba import cuda
import numpy as np

# Define a CUDA kernel function for element-wise vector multiplication
@cuda.jit
def multiply_vectors(a, b, c):
    # Calculate the unique thread index within the grid
    i = cuda.grid(1)

    # Ensure the thread index does not exceed the array size
    if i < a.size:
        c[i] = a[i] * b[i]  # Perform multiplication and store the result

# Define the size of the vectors
N = 10

# Create input arrays on the host (CPU)
a = np.arange(N, dtype=np.float32)   # Vector [0, 1, 2, ..., 9]
b = np.arange(N, dtype=np.float32)   # Vector [0, 1, 2, ..., 9]

# Create an output array initialized with zeros on the host
c = np.zeros_like(a)

# Copy input arrays from host (CPU) to device (GPU)
d_a = cuda.to_device(a)
d_b = cuda.to_device(b)

# Allocate memory on the device for the output array
d_c = cuda.device_array_like(a)

# Define GPU execution configuration
threads_per_block = 256
blocks_per_grid = (N + threads_per_block - 1) // threads_per_block  # Ceiling division

# Launch the kernel with the specified grid and block dimensions
multiply_vectors[blocks_per_grid, threads_per_block](d_a, d_b, d_c)

# Copy the result from device (GPU) back to host (CPU)
d_c.copy_to_host(c)

# Print the result
print("Result (Numba):", c)
/home/alex/miniconda3/envs/interpython_hpc/lib/python3.13/site-packages/numba/cuda/dispatcher.py:536: NumbaPerformanceWarning: Grid size 1 will likely result in GPU under-utilization due to low occupancy. warn(NumbaPerformanceWarning(msg)) Result (Numba): [ 0. 1. 4. 9. 16. 25. 36. 49. 64. 81.]PyTorch solution:
# File Name - torch_multiplication.py
# This script demonstrates element-wise multiplication of two vectors using PyTorch on a GPU.
# It shows how to create tensors directly on the GPU, perform the multiplication operation,
# and then transfer the result back to the CPU for display.

# Import PyTorch for tensor operations
import torch


# Define the size of the vectors
N = 10

# Create a vector of values [0, 1, 2, ..., N-1] stored on the GPU
a = torch.arange(N, dtype=torch.float32, device="cuda")

# Create another vector of values [0, 1, 2, ..., N-1] stored on the GPU
b = torch.arange(N, dtype=torch.float32, device="cuda")

# Perform element-wise multiplication directly on the GPU
c = a * b

# Move the result back to the CPU and convert it to a NumPy array for display
print("Result (PyTorch):", c.cpu().numpy())
Result (PyTorch): [ 0. 1. 4. 9. 16. 25. 36. 49. 64. 81.]Both codes now perform element-wise multiplication instead of addition.
References:
Summary
- Serial code is simple but doesn’t scale well.
- Use OpenMP and MPI for parallelism on CPUs.
- Use CUDA (or high-level wrappers like Numba/CuPy) for GPU programming.
- Always profile your code to understand performance.
- Choose your tool based on problem size, complexity, and hardware.
Key Points
Serial code is limited to a single thread of execution, while parallel code uses multiple cores or nodes.
OpenMP and MPI are popular for parallel CPU programming; CUDA is used for GPU programming.
High-level libraries like Numba and CuPy make GPU acceleration accessible from Python.